Thursday, October 29, 2015

Halloween Workout

Celebrate Halloween with this spooky workout! 

Warm up before trying any of these moves.  Begin with 10 repetitions each.  Do not perform any exercise that causes or increases pain.

Jack O’Lantern Squats
Begin in an upright position.  Take a small hop forward, landing with soft feet into a squat position, weight in your heels and arms raise parallel to the ground. Stand up, lowing arms to your side and repeat 10x.

 
Pumpkin Lift
Begin in an upright position holding a medicine ball.  Squat down and tap the floor with your medicine ball then stand up tall and reach the medicine ball overhead.  Practice good squat form keeping your knees behind your toes.  Repeat 10x.

 
Monster Walks
Tie a theraband around your legs, just above your knees.  Begin in an athletic stance with knees slightly bent and back straight.  Take big steps forward while staying in that athletic stance and keeping tension in the theraband.  Feel the burn in your glutes!

 
Double Double Toil & Trouble Leg Kicks over Bench
For the scary version of this popular Burdenko exercise, begin seated on a bench with both legs on one side.  Sit back on your tailbone, holding a pelvic tilt with your back straight.  Hold on the bench behind you for support.  Kick both legs straight over the bench together.  Tap the floor with your feet then repeat to the other side, alternating for 10 repetitions.

 
Candy Crunches
Begin by sitting on a physioball.  Walk your feet forward until the physioball rests on your upper back, shoulders and neck hanging off the physioball ball.  Keep your hipss elevated and perform a crunch with your head and neck in a neutral position. Repeat 10 repetitions.

 
Vampire V-Sit
Lay on your back holding a physioball between your feet.  Pelvic tilt pressing your lower back into the mat and lift the ball off the ground.  Pass the physioball from your feet to your hands.  Continue to lower the ball to the ground in your hands.  This is a challenging core exercise and it’s important that you only lower the ball as far as you can hold a pelvic tilt.  Continue to pass the ball back and forth for 10 repetitions.

 
BOOty Bridge
Lay on your back with your heels on a physioball.  Dig your heels into the physioball as you squeeze your glutes and lift your hips off the ground.  Hold for 2-3 seconds and lower.  Repeat 10x.

 
Spiderman Plank
Begin in a plank position. Bring your knee to your elbow (same side) while keeping your leg parallel to the floor.  Repeat on the other side, alternating for 10 repetitions.

 
Black Cat/Camel
Finish up your workout with this stretch for mobility in your back.
Begin on all 4s (hands under your shoulders, knees under your hips).  Start with your back in a neutral position then alternate between arching your spine upward toward the ceiling (cat) and rounding your back (camel) by relaxing your back and allowing your stomach to fall towards the ground.  Repeat 10x.

Boo! 
Blog post by Jen Skiba.

Wednesday, October 28, 2015

Free Weights vs. Weight Machines

There are so many different types of equipment that can be used in an exercise program. Two of the most popular types of equipment are free weights and weight machines. But how do you know which type to use? Each has their own pros and cons, but depending on your goal one could be more beneficial than the other.

So what are free weights? Any object that is not fixed to a set of axis is a free weight. This could be a dumbbell, barbell, medicine balls, physio balls, kettle bells, ankle weights, or even your own body weight. Each of these can move through various planes in all three dimensions. Weight machines involve various combinations of pulleys, cams, and lever arms working from a set axis. A set axis means they work from a fixed range of motion.

Free weights provide a constant resistance during an exercise. It doesn’t matter the position- lifting 5lbs is lifting 5lbs. However, the weight you actually lift on a weight machine changes depending on the length of the lever arm. This can work in your favor, especially if you are recovering from an injury. The lever arm will make lifting the weight easier for a weaker joint and harder for a stronger joint. So depending on your goal, both are beneficial. Most weight machines target a specific muscle, also aiding in rehabilitation from an injury. This isn’t as beneficial if you are looking for more functional movements, though. While weight machines isolate a muscle, free weights can help you target and indirectly work other muscles. Since free weights aren’t in a fixed plane and allow for three dimensional movements, muscles have to control the movement.

Since machine weights work on a system of pulleys, it is much easier to change the weight. Usually it is as simple as putting the weight stack pin in a different slot. You don’t have to work with weight plates or moving heavy pieces of equipment. These pulleys, however, limit the amount you can adjust the range of motion. Controlling the weight with free weights requires a higher level of skill as well as balance and coordination. It is recommended, especially with any power lifting, Olympic lifting, or heavy lifting in general, that a spotter is used to ensure proper form and reduce the risk of injury. Weight machines typically do not require the presence of a spotter because of their fixed range. Also, free weights typically require a greater metabolic cost, meaning you burn more calories.  
 
 
The equipment you use in an exercise program really depends on what goal you are trying to accomplish. If you are unsure about what you should be using and/or doing, seek the help of a personal trainer or other fitness expert. A combination of both can be used to get the most out of your workouts. Just remember- safety first!
 
Blog post by Nikki Courtney.

Sunday, October 25, 2015

7 BOSU Moves for Runners

Have you ever tried exercises on a BOSU Balance Trainer?  This half-dome stability ball is great for building a strong core, ankle stability and work on overall strength, balance and coordination.  Challenge yourself by adding a BOSU Balance Trainer to your current strength routine.  Below are 7 BOSU exercises with runners in mind focusing on the lower body, glutes and core—all super important for strong, fast, injury-free running! 

Warm up before trying any of these moves.  Begin with 10 repetitions each.  Do not perform any exercise that causes or increases pain.

BOSU Squats

Stand on the BOSU Balance Trainer, dome side up. Perform a squat, keeping good form and your weight in your heels. Stand up and repeat 10x.


BOSU Lunges

Stand on the ground facing the BOSU. Take a big step forward onto the BOSU into a lunge position with knee at 90 degrees. Push off the BOSU back to the upright starting position. Repeat with the other leg, alternating for 10 repetitions.


BOSU Side Lunges

Stand on the ground next to the BOSU. Take a lateral step onto the BOSU bending that knee while keeping the other leg straight. Your weight should be in your heels with your knee behind your toes and not past your ankles laterally. Return to start position. Perform 10 repetitions then repeat on the other side.


BOSU Side to Side Push Ups

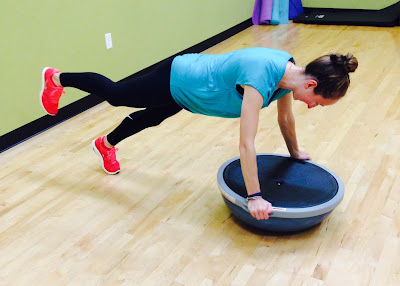
Begin in a plank position with your hands on the BOSU, dome side up. Walk one hand laterally off the BOSU and perform a push up. Walk you hands back onto the BOSU and repeat on the other side, alternating for 10 repetitions.


BOSU Plank with Leg Lifts

Begin in a plank position with your hands on the BOSU, this time with the dome facing down. Engage your glute muscles and lift one leg off the floor, foot flexed. Hold for 1-3 seconds and return to start position. Repeat with the other leg, alternating for 10 repetitions.


BOSU Plank with Mountain Climbers

Begin in a plank position with your hands on the BOSU, dome facing down. Alternate knees to chest starting slow and building to a faster pace.  Repeat 10x.


BOSU Single Leg Bridges

This exercise can be done on a BOSU with dome facing up or down. Lay on your back with knees bent and one leg on the BOSU. Lift and hold opposite leg in the air parallel with your bent knee. Engage your glutes and raise your hips off the ground. Perform 10 repetitions and repeat on the other side.


Blog post by Jen Skiba, RRCA Certified Running Coach

Monday, October 19, 2015

2 Types of Runs You Should Be Doing

Conversation Pace Run


Conversation pace running should be a staple to any training plan.  In fact 75-80% of your weekly mileage should be done at conversation pace.  So what exactly does that mean?

Think about a normal run for you.  Are you breathing heavily and struggle to get any words out?  Or are you relaxed, breathing easy and feeling good?

Conversation pace is that relaxed, breathing easily, feeling good kind of run.  It’s the pace you can run and hold a conversation or even sing a song at submaximal effort. 

Most runners tend run too hard, too often.  “If I am pushing myself to the limit every day, I will get faster in a race.  Right?”  Wrong.  High intensity running on an everyday basis will get you injured and/or burnt out very fast.   Don't get me wrong—it can also be difficult slowing yourself down but it will pay off in the long run. 

What are some benefits of a conversation pace run?
·      Increase aerobic capacity
·      Increase and improve oxygen consumption
·      Improve fat metabolism
·      Improve stamina/endurance
·      Helps the body adapt to the stress of sustained running

How can you make sure you’re not pushing yourself too hard?  At various points during your run, do a little talk test.  If you can’t spit out a sentence or two, slow it down.  Walk a little if you have to.  Chances are you’re heart rate is too high and you have crossed over into that anaerobic training zone where lactic acid starts to build up and fatigue sets in quicker.

Fartlek Run


Fartlek is a Swedish word meaning “speed play.”   A Fartlek run is just that—playing with speed!  It’s a form of interval training with fast bouts of running followed by a recovery period at conversation pace.

While there are many benefits to Fartlek training, a Fartlek run is meant to be fun.  The goal is to vary your pace (at about 70-90% effort) throughout the run and vary the time/distance of the sprinting and recovery phases.

A traditional Fartlek run uses landmarks on your route as markers.  Sprint to the next mailbox, jog two telephone poles, sprint to the next driveway, etc.  The increase in speed incorporates both the aerobic and anaerobic systems, challenging the cardiovascular system.

Running at the same pace all the time will cause a runner to plateau.  Experiment with Fartlek runs to change gears and recruit different muscle fibers.  It also helps simulate the racing experience.  Think about the small surges to pass another runner or slowing down to a walk at a water station.

What are the benefits of a Fartlek run?
·      Increase speed
·      Improve endurance
·      Build strength
·      Recruit different muscle fibers
·      Varying intensities means greater calorie burn
·      Practice and promote good running form

Fartlek running is great when you are starting to incorporate speed workouts into your training.  Make sure you have a good 4-8 weeks of aerobic base building down before you start any interval training.

Don’t forget to warm up before beginning a fartlek run!  Start with only a few repetitions in Week 1 and over time increase the number of repetitions along with increasing speed intervals while decreasing rest intervals.  Remember this is a form of interval training and a hard effort so limit to once a week—not every run!  With any interval training you want to avoid doing too much too soon.
 
Incorporate these two types of runs into your training routine & plan, progress, perform!

Blog post by Jen Skiba, RRCA Certified Running Coach.

Wednesday, October 14, 2015

The Burdenko Method: Land & Water Exercise

The Burdenko Method

Do you know what Burdenko is?
The Burdenko Method is part of the Burdenko Water and Sports Therapy Institute. Dr. Igor N. Burdenko founded the institute in 1984, focusing on the practical application of water and land exercises. He takes a holistic approach to rehabilitation, conditioning, and training which allows the method to benefit all ages and conditions. After more than 30 years of working with rehabilitation clients, training athletes in the NBA, NFL, NHL, US and Russian Olympic teams, members of the US Handicapped Olympic Team, and top international dancers and figure skaters, Dr. Burdenko has become internationally recognized in the rehabilitation and fitness worlds. The methodology works in a pyramid fashion- you must achieve the skills at the bottom of the pyramid to effectively master the skills at the top. The Burdenko Method also uses various equipment and speeds while exercising.
 

Water & Land Exercise

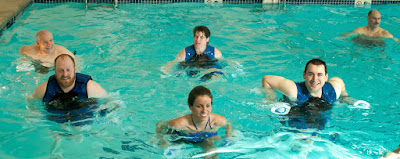
The Burdenko Method utilizes not only exercises in the gym, but in the water. What makes aquatic exercise so beneficial? Being in the water eliminates about 90% of your body weight, taking the stress of your muscles, bones, and joints. This occurs because water helps to stop the gravitational pull on the body, allowing you to move more freely than you would on land.
 
Most aquatic exercises used in the Burdenko Method are done in an upright position. By being vertical, the body’s buoyancy and posture is challenged. In turn, this helps to strengthen and stabilize the trunk, spine, and pelvic areas. Progressions to supine (on the back) and prone (face up) are also used for an added challenge. There are exercises done in shallow water as well, allowing the body to work against a gentle resistance.
Land exercises are also done progressively. Typically, one starts in a horizontal position: supine to sidelying to prone. This allows the freedom of movement from the extremities. Exercises can also be done sitting, standing, or moving dynamically. Many of the exercises can be done with or without additional equipment.
 
“Finding one's center of buoyancy and balance in deep water is the first step to experience pain free movement (Level 1). Then, by adding a combination of movements in different planes (vertical, supine, prone) in deep water and with horizontal mat exercises on land, coordination develops (Level 2). Level 3 adds challenges with different equipment and environments to increase the natural force of gravity.” “Your personal experience with Levels 1, 2, and 3 will allow you to progress to Levels 4, 5, and 6. You will develop qualities of endurance, speed, and strength.”
Blog post by Nikki Courtney.
References
Burdenko, I., & Gray, P. (2001). The Burdenko Method Exercise Guide Part 1. Wayland, MA: The Burdenko Water & Sports Therapy Institute.
Burdenko, I. (2002). Burdenko Exercise Guide Part 2. Wayland, MA: The Burdenko Water & Sports Therapy Institute.