Tuesday, June 24, 2014

Flexibility Training on the TRX

Flexibility can and should be trained as part of your routine, just like training for strength, speed, or power. The American College of Sports Medicine just released new guidelines for flexibility exercise.

            "Flexibility Exercise
Adults should do flexibility exercises at least two or three days each week to improve range of motion.
Each stretch should be held for 10-30 seconds to the point of tightness or slight discomfort.
Repeat each stretch two to four times, accumulating 60 seconds per stretch.
Static, dynamic, ballistic and PNF stretches are all effective.
Flexibility exercise is most effective when the muscle is warm. Try light aerobic activity or a hot bath to warm the muscles before stretching."

But why stretch with the TRX straps? Because there is nothing this simple piece of equipment can't do! That is why!
•    The TRX will act as a "partner" allowing you to try out the PNF style of stretching. There is where you contact and relax your muscle to allow for a greater stretch.
•    It will help assist you into greater ranges of motion, deepening your stretch.
•    You can stretch multiple areas with one exercise. Who does't love to multitask! 

Stretching on the TRX as part of a flexibility program can help to diminish many of the aches and pains you experience after a tough workout or sitting at a desk (or on the couch) all day. Building greater flexibility also:

•    Improves circulation
•    Improves range of motion
•    Improves posture
•    Decreases joint stiffness
•    Decreases muscle tension
•    Promotes awareness of body in space
•    Facilitates relaxation

Don't just leave the gym after your workout.  Grab the TRX straps and do a quick stretching routine while your muscle are warm. Or even plan an active recovery day to do a 20-30 minute stretching routine!

Here are 5 stretches you can do with the TRX. There are a ton more, so ask a trainer if you need help stretching in a particular area!
  

Hamstrings

Lower the straps all the ways down and covert to single arm mode. Sitting on the ground, place one heel into the straps. Keeping your back and legs straight slowing walk yourself forward away from the anchor until you feel a stretch in the back of your leg.


Hip Flexors

Raise the straps so they hang around knee height. With your back to the straps, place one foot into the loop. Your knee should comfortably rest on the ground. Lunge out to 90 with the free foot and press forward through the hips to hold the stretch.


Calves

Don't forget your calf is made up of two muscles and both need to stretched! With the straps still in single arm mode, stand up and place one heel into the loop and straighten out your leg. Pull back on the strap until you feel a stretch through the upper part of your calf. To target the lower portion of you calf, bend your knee while still pulling back on the strap.


Chest

Revert straps back to double arm mode. Grab a hold of each strap and walk away from the anchor. As you get further away, let you arms stretch out to the side until the are in line with your shoulders. Step out with one foot and lunge your body forward while keeping your chest up.
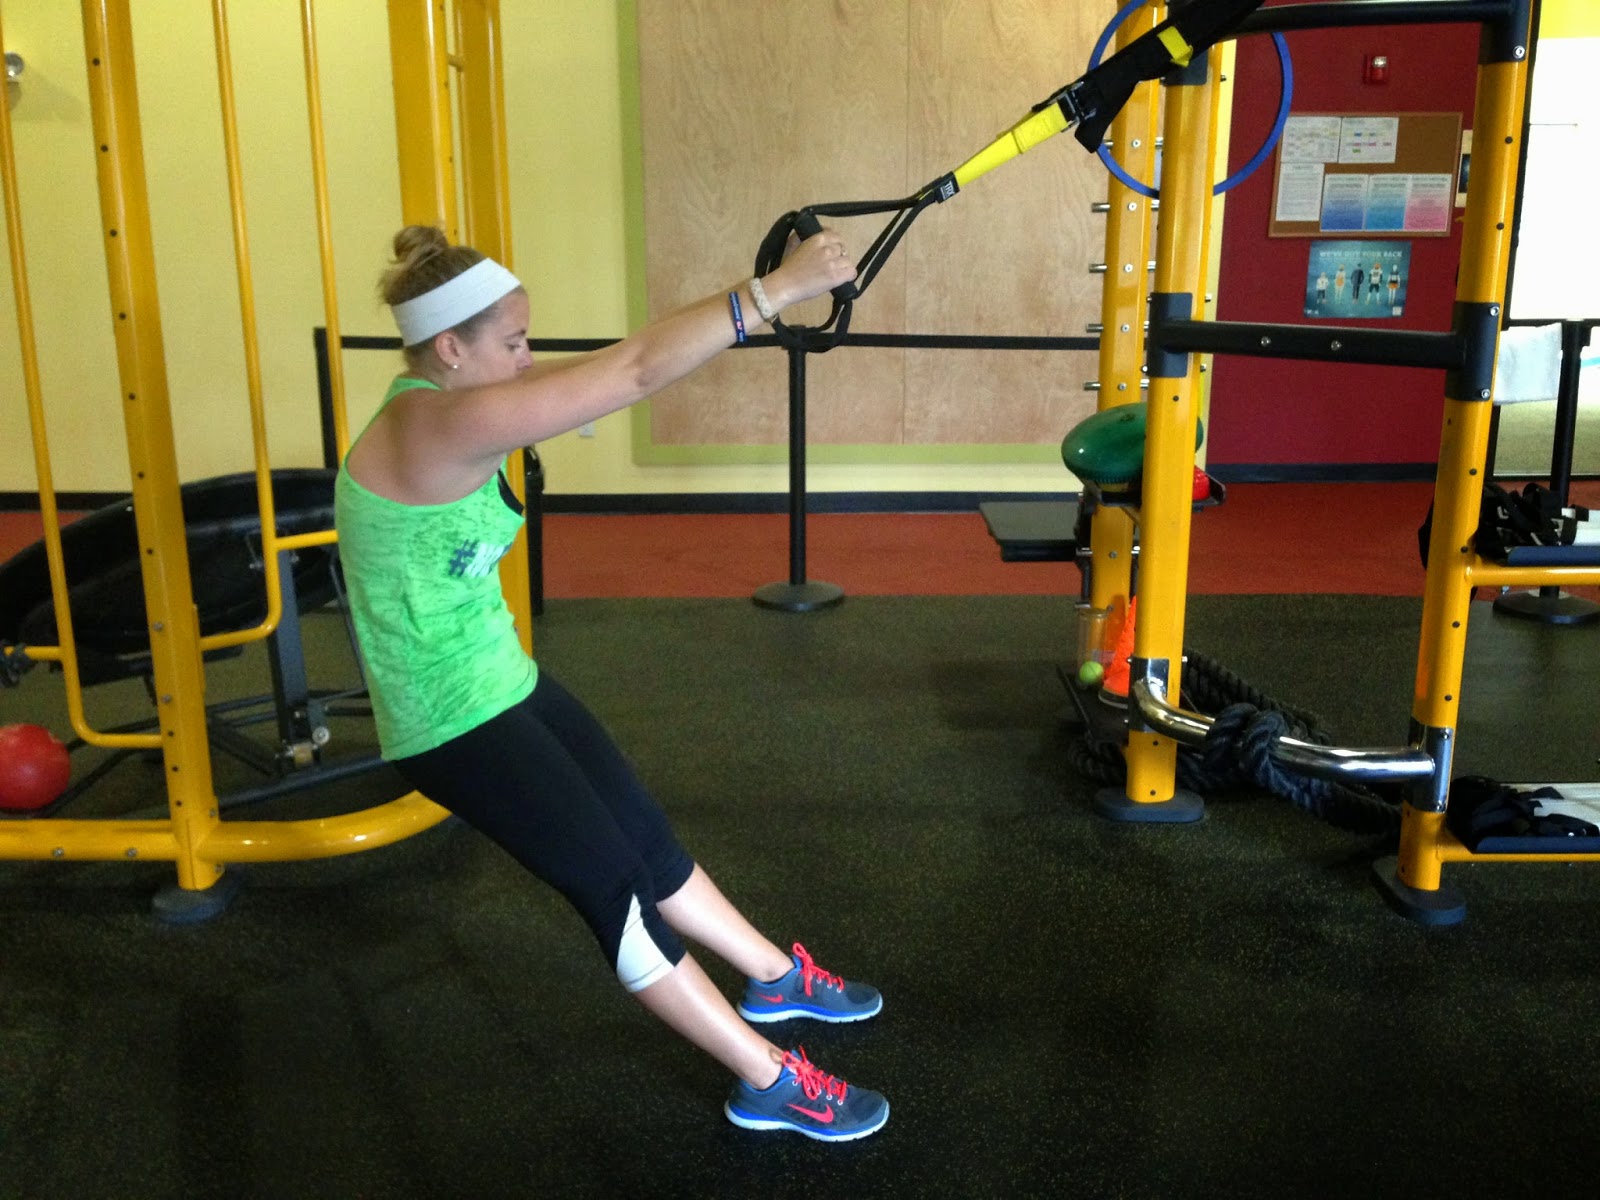

Back

Holding onto the straps, slightly lean back with arms extended and shoulder blades engaged (think like you are trying to squeeze them down and together). This is the starting position. Slowly let your shoulder blades relax. As a result your arms will be pulled forward by the straps. Keeping your body in a straight line, round your upper and hold the stretch. To target your lats, hinge at the hip letting your back flatten out and rotate to one side then the other. 


Blog post by Catie Furbush CSCS.

Thursday, June 19, 2014

Make Cardiovascular Training Fun with Intervals

I will preface this blog by saying I am NOT a runner...in fact I dislike all things cardio. At least cardio in the traditional sense. Cardio is boring. Run for more then 12 minutes and I am done.

Okay, with that being said, cardiovascular training is very important and should be incorporated into your exercise routines. If you can go for a long run or hit the elliptical for 30+ minutes, good for you! But for those of us with shorter attention spans, how do we keep it interesting?

And the answer to that is....INTERVAL TRAINING!

So what is Interval Training?
Interval training is a type of training that incorporates high-intensity bouts of work followed by lower intensity bouts of work, or rest, that is repeated for a specific number of repetitions depending on the fitness level of the individual.

How do I incorporate it?
Interval training can be performed on multiple pieces of cardiovascular equipment or outside on the track; the possibilities are endless. Once you can complete 20-30 min of continuous exercise, start by incorporating 1-2 min of more intense exercise, followed by 1-4 min of recovery time.

Hop on a treadmill warm up with 5 minutes of walking or light jogging; do the same for a cool down. Try 5 sets of 3 minutes running followed by 3 minutes of walking or jogging.

You can do the same on a stationary bike. Make sure you warm up then try 8 sets of 1 minute intense sprints followed by 1 minute of light cycling.

Feel like running outside? Not a problem. Head to the high school track, do a quick dynamic warm up followed by 10 sets of 50 yard sprints then walk 50 yards to recover. When running outside, I find that using telephone poles is a good way to monitor intervals. Jog to a telephone pole sprint to the next and before I know it, I just ran 2 miles!

Repetitions and work-to-rest ratios should be modified to meet your fitness level and needs. If you are just starting out, instead of using a 1:1 work:rest ratio, a 1:3 or 1:4 may be better, until you have achieved a higher level of fitness. Or on the flip side if you really want a challenge try a 2:1 or 3:1 ratio.


**Although, there are many benefits with interval training, caution should be used before incorporating it into a training program. Due to high intensity, near maximal training loads, individuals should have a solid foundation of cardiovascular fitness before adding it to their program.**


Blog post by Catie Furbush CSCS.

Thursday, June 12, 2014

Spinning Tips for New Riders

Thinking about attending your first Spin Class?  Spin is an awesome cardiovascular workout with high energy, the lights turned down and the music turned up!  Here are my tips for new riders:

Arrive early.

Proper bike set up is extremely important for safety and injury prevention. Class begins on time so arrive 10-15 minutes early to ensure enough time for the instructor to help get you oriented.

Drink lots of water.

It is recommended by Spinning.com to drink 40 oz of water for a 40 minute spin class.  8 oz of water about 30 minutes before class, 24 oz during class, and 8 oz within 30 minutes after class.  If you get to the point where you feel thirsty, you are already enduring the early stages of dehydration.

Bring a towel.

You will sweat!  Some fitness centers will supply towels to their members.  If you are unsure, it’s best to bring your own just to be safe because I guarantee you will want one!

The bike seat isn’t that bad!

Don't be intimidated by the small & narrow bike seat! It only takes a few classes to get used to it. To improve your comfort, wear bike shorts or bring a padded seat cover to class.

Wear a heart rate monitor.

A good instructor will incorporate heart rate training into the ride.  It adds another element to your training and allows you to see your progress and continual improvements to your fitness.  Benefits include: improves fitness levels, more efficient training, avoid over-training, less chance of injury, increases metabolism & fat-burning efficiency, and most importantly – you’re in control of your workout and intensity.

Go at your own pace.

The best part about a spin class is that anyone and everyone can experience a great workout from beginners to seasoned athletes.  The instructor is there to motivate and guide riders through a class but it’s ultimately up to you to choose the intensity.  Some riders never get out of the saddle – and that’s ok!  I always say – you can do what you want as long as you’re pedaling!

Most importantly... Have fun!


Blog post by Jen Skiba.

Sunday, June 8, 2014

Combating your Desk Job Slouch

There’s no question that the human body is designed to move, but with the rise in desk jobs, we spend more time sitting than moving. And with that, we come across a number of problems: lower metabolisms, low back pain, tight hip flexors, slouching posture, and weak cores among them.

Combat some of the work-related issues in the gym with these moves:


Hunching over your desk/keyboard

This is a huge cause for much of the stress we hold in our shoulders and the poor posture we experience. 

IYTWs over a ball:
You can do these with low weight or no weight, with or without a hold, and with your palms in a number of positions to challenge your muscles. The key is to pinch your shoulder blades and draw them down your back as you lift your arms through the patterns.  This activates the rhomboids rather than the trapezius (which is already well developed in tense shoulders!). Try one to two sets of ten to start and notice how much straighter you stand up after! 


D1/D2 with a band:
These are diagonal patterns that work the shoulders and back complex and can be done in a number of different directions. Stand with the band in your right hand and under your right foot. Bring your hand across your body in a diagonal pattern up towards your left shoulder and return it back to your right side. This is a D1 pattern. You can also do it in reverse, with the band attached up high by your left shoulder and in your right hand, and drawing it down across your body. Sometimes we call these "Wolverines" because it's just like how Hugh Jackman whipped his claws out.


For D2 patterns, stand with the band under your left foot and in your right hand, with your hand by your left pocket. Draw it up across your body diagonally as though you're unsheathing a sword and then return it across your body to your pocket. Again, you can do this move in reverse, attaching the band up high and drawing it low. 


Rowing with a band:
For this, hold two ends of a band that is wrapped around a pole in each hand, pinch your shoulder blades down and back, and draw your elbows towards the wall behind you while keeping your forearms parallel with the floor. 


Stretch it out:
Try a prayer stretch (also called child's pose in yoga) to stretch out your shoulders and back. Start in a table-top position (on hands and knees, with your hands directly under your shoulders and knees directly under your hips) and sit back on your heels. If needed, you can walk your hands out a bit more in front of you once you're seated back. You can also try this with a rotation, where you start with your hands off to one side, and then sit back. You'll feel it more along one side. 


You can also try an upper trap stretch. While standing up straight and looking straight ahead, bring one ear towards your shoulder, then to the other side. To increase the stretch, push the heel of your hand down towards the ground on the side opposite the ear (so if you're dropping your left ear to your left shoulder, push your right hand towards the ground).

A good stretch to loosen up your chest and shoulders is the doorway stretch. Stand in a doorway with your arms bent and step into it. You can change the angle on this one, depending on which fibers are tightest.  


Tight Hip Flexors/Low Back Pain

A little while back, Drew wrote a great article on stretching out hip flexors that become tight from being in a shortened position (as they are when we're sitting). Check it out here.


Core

I'm sure you'll love me for saying this, but planks are some of the best exercises to strengthen the entire core. There are a TON of ways to do them to keep them interesting and fun (go ahead, ask me sometime!) but the best way to start? Try modified planks. These are just like regular planks, but your knees are on the ground instead of your feet, shortening the work load and allowing you to really focus on your form. When you get comfortable with those, you can progress to regular planks and side planks and increase your time! Just make sure you keep that form perfect.


Blog post by Ashley Crosby.