Thursday, November 16, 2017

Get The Most Out Of Your Personal Training Sessions

Personal training is an option for members who need the extra motivation or guidance to get through a workout.  It’s also a great way to learn new exercises and progress your fitness routine.

Working with a trainer is great but are you getting the most out of your sessions?


Set Clear Goals


It’s important that you and your trainer are on the same page.  It’s also important that you set clear goals so your trainer can build the appropriate program for you.  Think SMART goals: Specific, Measurable, Achievable, Realistic, Timely.  Goal setting should be worked into your first appointment and revisited during each session.

Arrive Early


I say this over and over again to my clients… warm up before your session!  Showing up late not only cuts into your training time but now the trainer has to incorporate a warm up into the routine leaving not much time for actual exercise.  Show up early to get in a little cardio, dynamic stretches and/or foam roll so you’re ready to go when the session begins.

Speak Up


Communication should go both ways.  Ask questions.  Let your trainer know how you’re feeling and exactly what you’re feeling.  If something isn’t right, don’t be afraid to speak up.  We appreciate your feedback and honestly!

Do Your Homework


You can’t just show up to your once a week training appointment and expect to see progress.  Your trainer can work with you to build a weekly plan but it’s ultimately up to you to commit by exercising on your own, eating right and recovering well. 

Bring A Buddy


Still struggling with motivation?  Find a friend with similar fitness levels and goals to team up with.  They can help get you out the door on days you may consider cancelling and help push you harder during the workout.  One-on-one personal training can get expensive so ask about most cost-effective group personal training rates.

Attitude Is Everything


Everyone has their own reason for working out but if you’re not invested in your own health and fitness, you’re never going to get results.  A positive attitude is key along with patience, commitment, consistency, and hard work.

Blog post by Jen Skiba.

Monday, November 13, 2017

Perform a Better Prone Plank

Do you remember your first plank you were asked to hold? Did it feel like the seconds were minutes and that someone had lit a fire under muscles in your stomach that you never knew you had? Well if you dread the plank or are having a difficult time maintaining good form here are a couple methods to use to improve your experience.

Do you ever get pain in your lower back? Set up is key!


When preparing to plank it is important to remember the focus of the exercise is preventing hyperextension of the lower back.  That being said, engaging the muscles of the lower abdomen and pelvis properly before even lifting off of the table is crucial in preventing any excessive motion in the lower spine. One strategy is utilizing the Posterior Pelvic Tilt. This exercise will teach you how to build tension in your lower abdomen and create a “flat back” to help aid in any drooping or arching of the lower back when in the prone position.

Supine Posterior Pelvic Tilt with Ball Squeeze

Begin by lying on your back with your knees bent and feet flat on the floor. Place a ball between your knees and squeeze. Slowly bend your low back and tilt your pelvis towards the floor. Return to start position.


Do you feel more pressure in your shoulders than your stomach?


Improper alignment of the shoulders over the elbows can cause abnormal strain on the individual’s tendons and ligaments of the shoulder joint leading to possible injury. It is just as important to ensure to keep the weight of your torso from sinking to the ground as well as shifting forward during the plank. This can again place a shearing force across the joint line of the shoulder and needs to be avoided. One exercise that can help is the Scapular Push Up on a Table.

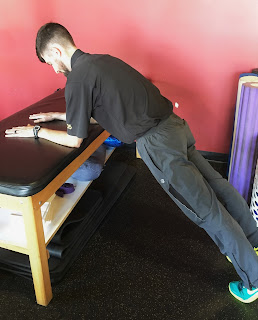
Plank on Table with Scapular Protraction Retraction

Place both hands on the edge of a table and step your feet back into a plank position. Slowly round your upper back, pulling your shoulder blades apart. Next, lower your back down, squeezing your shoulder blades apart.


Remember to breathe!


How often do we tend to hold our breath when performing strenuous exercise? This sometimes can hurt you more than help you. In our case with the plank, a deep exhale through pressed lips can help tighten your core just before you lift up and continue to hold the ribs down to prevent hyperextension at the back during the hold. Quadruped Diaphragmatic Breathing drills can help you establish a good spinal position as well as core contraction just from breathing!

Quadruped Diaphragmatic Breathing

Begin on all fours. Breathe in, pushing your abdomen down, then exhale and repeat. Make sure there is no movement in your chest or shoulders as you breathe.


 Plank Progressions: 


Plank with Elbows on Table --> Plank on Knees --> Standard Plank


Plank with Elbows on Table


 Plank on Knees


Standard Plank


Blog post by Craig Moody.

Tuesday, November 7, 2017

Apple Cider Vinegar


It’s apple season!  We all have our favorite types of apples—my personal favorite is Macintosh—and ways to incorporate apples into our diet (apple pie for the win!) but have you ever used Apple Cider Vinegar (ACV)?  Here are some benefits:

Helps Lose Weight
Always check with your doctor or nutritionist before adding anything new into your diet but when taken before meals, ACV lowers the glucose and insulin levels in the blood after the meal. This has a threefold effect of keeping one full, reducing fat storage, and improving risks of heart attacks caused by glucose spike. Take 1 tablespoon diluted in 1 cup of water before a meal daily. Do not have more than 2 tablespoons per day.

Offers Cosmetic Benefits For Skin And Hair
ACV is popular as a natural hair and skin care remedy. Here are some ways you can use it. Remember, these are home remedies that have been used by individuals, but until scientific study backs up wider use, you may want to try these with some caution – and only if your skin and hair are not too sensitive. Always test a small patch of skin first to ensure you don’t have an adverse reaction to the remedy.

  • Skin Toner And Facial Cleanser: Mix a tablespoon of ACV into a cup of clean water and dab onto your face with a clean cotton ball. You should feel your skin tighten and your pores should close up. Rinse off once dry.

  • Sunburn Remedy: If you have a sunburn, applying diluted ACV (about half a cup to every four cups of water) can help heal the skin and may even prevent blistering.

  • Dandruff Remedy: For dandruff or itchy scalp, rinse hair and scalp with ACV that has been added to your regular shampoo. You could also just rinse it through with a mix of plain water and ACV, with both in equal amounts.

  • Natural Deodorant: The acetic acid in ACV kills the bacteria on your skin that decomposes sweat and creates body odor. Dip a cotton ball in a 1:1 ACV and water mixture. Swab your armpits with it. Let it evaporate. Then powder the armpits with a 1:1 cornstarch and baking soda mixture to keep dry. If you are worried about the vinegary smell, just add a few drops of your favorite essential oil.

Detoxes Your Body
ACV also features in detox regimens. That is because it may bind to toxins that have accumulated in your body and help expel them. As toxins build up in your body, its ability to function at its best also declines. Taking ACV may help offset some of that.

Lowers Blood Pressure
ACV may also have benefits for those with high blood pressure. Animal studies have proven the hypotensive action of the vinegar, showing that it can lower blood pressure possibly due to the acetic acid in it. However, human studies must be done before it can be suggested as treatment for the problem. It also helps that the potassium in ACV eases tension in your blood vessel walls, lowering blood pressure.

Alleviates Plaque Psoriasis
Plaque psoriasis causes red raised patches and silvery skin to develop in those afflicted. Besides the knees, elbows, and lower back, it can also leave you with a scalp that’s itchy and painful. According to the National Psoriasis Foundation, using ACV as a rinse on the scalp can relieve symptoms like itching and associated pain or discomfort.

Improves Insulin Sensitivity In Diabetics
Insulin resistance and diabetes have the uncomfortable ability to make life that extra bit challenging. Which is why the antiglycemic effect of ACV is so important. ACV can improve insulin sensitivity in those who have type 2 diabetes. It ups the glucose intake by the tissues of your body and prevents the complete digestion of complex carbs. The result are blood glucose levels dip, enabling you to avoid spikes and fluctuations that diabetics dread. With better control over diabetes, you are that much closer to getting your health back on track.

But here’s where it gets tricky. Taking ACV with blood glucose-lowering medicines may dip your sugar levels below normal, leading to hypoglycemia. So always ask your doctor.

Reduces Bad Cholesterol And Increases Good Cholesterol
Another area in which ACV makes a mark is heart health. If you are hoping to ward off cardiovascular illness, taking some ACV can help. The antioxidant polyphenols in it can help lower the “bad” LDL cholesterol levels in the body. Chlorogenic acid, one such polyphenol, also does not allow the LDL to oxidize and form fatty deposits in the arteries. This helps keep your blood pressure in check and your heart in better shape.

By improving your heart health, you boost overall fitness. You may, therefore, be able to stay active and build up the stamina to work out – good signs if you want to lose weight.

Even if you eat a cholesterol-rich diet, like fatty meats and dairy, drink a little with warm water before all meals to improve digestion and reduce serum cholesterol levels.

Stimulates Growth Of Helpful Gut Bacteria
ACV is a functional food that helps you keep a favorable balance of gut flora. Considered a prebiotic, ACV can also help stimulate the growth of good bacteria in your intestine. These are needed not just for good digestion but also for health and well-being and enable the body to fight off infections better. A tablespoon of ACV mixed with water is a good aid for digestion too. Apple cider vinegar can also treat acid reflux. Drink 2 teaspoons mixed in a glass of water at each meal.

Protects You From Fungal Infections
ACV has antifungal properties. This is invaluable when dealing with common problems caused by the growth of the yeast candida, also responsible for oral thrush. Research has shown it to be an effective antifungal agent with therapeutic potential in problems like denture stomatitis, which is the inflammation and redness of the area beneath a denture.

Other Possible Benefits
There are a lot of popular claims about how ACV can cure the common cold, treat eczema, and get rid of warts. But we do not yet have any scientific evidences to prove these, so we cannot recommend ACV for these purposes. But you can of course go right ahead and drink ACV for all its other benefits.

How To Have ACV For Health Benefits
Whatever your purpose, ACV can be consumed in a few popular ways. Common dosages range from 1-2 teaspoons (5-10 mL) to 1-2 tablespoons (15-30 mL) per day. Do not go above that, because excess consumption may have harmful effects.

  • Plain ACV: If you have a stomach for it, simply drink up the dosage suggested by your naturopath or specialist, or have a therapeutic dose of about a teaspoon before each main meal as most people do. Make sure to wash down with a glass of water as ACV can erode tooth enamel and burn the tissue of the esophagus. 
  • ACV With Warm Water: Another popular way is to mix the apple cider vinegar with a glass of warm water so it goes down easy.
  • ACV In Drinks: Simply add ACV to water, add some honey, and you have a refreshing drink. You can also add some to smoothies or juices.
  • ACV In Food: You can also add it to salad dressings and marinades. Also use it as a glaze or baste meat and vegetables with it.

Should You Have Raw Or Organic ACV?
Raw or organic apple cider vinegar usually refers to the unfiltered version of the vinegar. It has a cloudy appearance and contains some of the bacteria involved in the fermentation process as well as enzymes and protein strands – also called the “mother.” Non-organic ACV is pasteurized and its nutrient content is thought to be lower than organic ACV.

While some people believe that the “mother” is responsible for all the health benefits of ACV, this hasn’t been proven adequately via scientific research. Also, the high bacteria content in the unpasturized organic version may not agree with everyone.

On the other hand, the acetic acid in both organic and non-organic ACV has been found to have some marked benefits. Depending on your constitution and needs, your healthcare provider will be best equipped to recommend one of the two.

Blog post by Ally Wilson.

Monday, October 23, 2017

The Great Debate: When to use heat and when to use ice


Different methods of heat and ice therapy prove to be an effective and inexpensive way to provide relief. When is it good to heat and when is it beneficial to use ice? The correct use of heat and ice at the proper time can aide in reducing recovery time.

Let’s first understand what heat and ice do. Ice constricts blood flow to muscles, thus decreasing swelling, bruising and discomfort. As the muscle cools, the amount of blood in the muscle diminishes as the constriction process pushes it out. As the muscle warms and the blood vessels expand, new blood comes rushing in and cleans the debris left behind from the injury and stimulates the healing process. As a general rule of thumb, icing is best for acute injuries.

The application of heat therapy stimulates blood flow to the area, which brings restorative oxygen and nutrients. Additionally, heat can inhibit the transmission of pain signals to your brain and decrease your stiffness. Heat is generally not a good idea for new injuries because it can make the swelling and inflammation worse. Heat can work very well for chronic pain, relaxing muscles before exercise.

A common problem area for many people is the low back. Chronic pain can be debilitating and extremely uncomfortable. So what might be best for chronic low back pain? There is no straight forward answer; it may be trial and error until you find a remedy that works best for you. But when it comes to exercise, many people with chronic back pain find heat therapy helps to warm up their muscles beforehand, while cold therapy helps with pain and inflammation afterwards.

The chart below identifies some common reasons for pain and which treatment is most beneficial. Remember if you have any serious injuries consult with a doctor before self-diagnosing.


Blog post by Farran Jalbert.

Thursday, October 5, 2017

Heart Rate and Recovery: Why is it important?


Do you know that feeling once you have made it past the point of just “warming up” and beginning to feel out of breath during your workout? Once you get feel that feeling do you ever notice how your heart rate begins to increase? This occurs when the demand for fresh oxygenated and nutrient rich blood is needed to be transported to the muscles performing the arduous tasks. However if your heart muscle is weakened due to lack of exercise, heart disease, or a neurological disorder, it can affect how well you can perform as well as recover.

A research study by Michael S. Lauer, MD, (director of the Cleveland Clinic Exercise Laboratory in Ohio and the lead researcher of the study) found that individuals who had a heart rate (HR) recovery score of <12 beats per minute (bpm) were at a higher risk of heart disease than individuals whom had a normal HR recovery of 15 to 25+ bpm during an exercise stress test. (1)

How can I test my Heart Rate Recovery Time?


You can perform many different tests to increase your HR like riding a bike for a set amount of time, walking on a treadmill or the track for distance, ERG rowing machine, or just marching in place for 2 minutes. Most importantly you will need to know your desired HR target should be.  The table below can give you an idea of roughly where your target HR should be during test before completing the exercise to measure your pulse for the recovery rate.


To measure your recovery rate, take your pulse immediately upon finishing exercise then measure 1 minute post and 2 minutes post exercise and compare your BPM results. The bigger the difference the BETTER!

Here are a few inferences:


  • If the difference between the two heart rates is less than 22, your real age of heart is slightly more than your biological age (that calls for lifestyle and dietary modification)
  • If the recovery heart rate difference is in between 22–52 beats per minute; your biological age (or calendar age) is approximately the same as that of your heart age/ real age
  • A recovery heart rate difference of 53–58 beats per minute indicates optimal health, healthier heart and a real age of less than calendar age.
  • If the difference of your immediate post exercise heart rate and heart rate after 2 minutes is in the range of 59–65 beats per minute, your heart is healthier and your real age is moderately less than your biological age.
  • With a difference of more than 66, your heart is very healthy and your physical age is a lot less than your calendar age. (2)


Blog post by Craig Moody.

References:
(1) https://www.webmd.com/heart-disease/news/20000919/researchers-find-heart-rate-worth-thousand-words#1

(2) http://www.med-health.net/Recovery-Heart-Rate.html

Friday, September 22, 2017

Falls Prevention Awareness Day

There seems to be a day for everything on the calendar! National Hot Dog Day was July 19th, October 4th is Random Acts of Poetry Day, October 9th is National Fire Prevention Day and September 22nd is Falls Prevention Awareness Day!  

Some are more important than others.  Preventing falls should be high on the list.  There are some alarming statistics related to falling:

  • One in four Americans 65 and older fall each year,
  • Annually 37.3 million falls require hospitalization,
  • And an estimated annual cost of $67.7 billion due to fall injuries by 2020.

Fortunately one of the best strategies for preventing falls is exercise.  

A simple but highly effective exercise to maintain or improve balance only requires a chair.  At the surface the sit to stand exercise seems very basic and possibly easy for some (until you do multiple repetitions in a set).


Begin sitting upright with your feet flat on the ground underneath your knees. Move your shoulders and head over your toes, bring your knees forward, and allow your hips to come of the chair, then push down equally into both feet to stand up. Sit back down and repeat.

Tip: Make sure to keep your weight evenly distributed between both legs, and try to keep your back straight throughout the exercise. Do not lock out your knees once you are standing. 


What makes this exercise one of the top choices for improving balance and preventing falls, to start it is functional.  Think about how many times you have to get up and down from a chair throughout your day.  Often standing up from a chair people feel unsteady and need to take a moment to ready themselves before walking.  Practicing this exercise will not only improve your leg strength which will make the act of getting up and down easier but it will also give you confidence that once you are standing you will be able to move.   The sit to stand exercise requires minimal equipment, all you need is a chair! It can be executed in a safe manner and modifications can be made to make it more or less challenging. The use of arm rests on a chair to assist in standing is one modification that can be used to make the exercise easier.  If you have difficulty with your balance once you are standing try placing your chair near a counter so you have support in front of you once you are on your feet.

Start with trying to build your repetitions gradually up to a set of 10.  Once you are able to achieve this goal you can add multiple sets throughout your day.  One simple way to sneak in some extra reps is to stand up and sit down twice when getting out of a chair! 

Blog post by Eric Chandler.

Wednesday, September 20, 2017

Osteoporosis: Lazy Isn’t for Bones

Osteoporosis and Screening

Osteoporosis is a disease that reduces the strength and mass of bones, making them fragile and susceptible to fractures. Although it is most common in middle-aged and older women, osteoporosis can affect both men and women of any age. According to the National Osteoporosis Foundation, about nine million Americans have osteoporosis and an estimated 48 million have low bone density. This means that nearly 60 percent of adults age 50 and older are at risk. One in two women and up to one in four men age 50 and older will break a bone due to osteoporosis. One measure of the health of bones is “bone mineral density” or BMD for short. A bone scan to assess BMD is a relatively simple procedure that is offered by medical practitioners. The U.S. Preventive Services Task Force (USPSTF), an independent panel of experts commissioned by the government to study the evidence behind routine health screens, has issued guidelines for osteoporosis screening. They recommend that women younger than 60 get bone density scans if they have risk factors that increase the likelihood that they could experience a fracture within the next 10 years. That means women with parents who fractured bones, a broken bone after age 50, post-menopausal, a history of smoking, alcohol abuse, or a slender frame. The panel maintained its recommendation that women age 65 and over and men 70 and over should get bone density testing, even if they have no other risk factors. Plan for the future - Talk with your health care provider to find out what is recommended for you.


Pressure your bones into growing stronger

For bones to increase and maintain their density, they require the application of weight-bearing force.

In fact, studies suggest that the best exercise may not only be weight-bearing but also impact exercise. This means imparting a jolt to muscle and bone such as you would when placing a foot forcefully on the ground while running, or lifting or pushing a weight suddenly. Naturally, you have to ensure you do such exercise safely.  Weight-bearing exercise, when preformed correctly, causes the muscles and tendons to pull on the bones. This stimulates them to produce new cells to replace old ones and absorb calcium, making them harder. The load on the bones can be created by your own body weight or by external weights like dumbbells or gym machines in a weight training program. 

Appropriate exercise as we age, not only help keep bones healthy, it protects against falls and fractures as well improving balance and strength.


Suggested Exercises to Help Build Bone Density

While all exercise benefits your general fitness. Weight-bearing exercise is best for strengthening bones.

Some good examples are:

  • Running and jogging
  • Gymnastics
  • Aerobics class -- step, dance, and floor aerobics
  • Weight lifting -- dumbbells, barbells, machines, body weight exercises
  • Team sports involving running and throwing -- basketball, football, baseball, softball, volleyball
  • Individual sports involving running -- racket sports
  • Walking (but less effective than running or jogging)

Examples of least effective exercises:

  • Swimming
  • Water aerobics
  • Cycling

These exercises are not useful for building bone density but are still effective in building cardiovascular fitness. Bear in mind that running or leg-based exercise acts mainly on the lower body.

And although much of the disabling effect of bone loss is felt in the hips and spine, exercising the upper body with weight-bearing exercise is of equal importance. Broken wrists and arms from falls, as we age, are not uncommon.

Without proper diet and exercise, bone density deteriorates over time, leading to symptoms such as back pain, poor posture and fractures. A well-rounded fitness plan, including cardiovascular exercise, weight training and flexibility exercises, combined with a healthy food plan, will help to prevent bone loss as we age.


Blog post by Ally Wilson.

Monday, August 14, 2017

GLUTES


The gluteal region of the body is made up of several muscles that help stabilize and move the pelvis around. A few standout muscles are the glute medius and the glute minimus. These muscles have an important role in stabilizing the pelvis during movement as well as during single leg exercise. If you are standing and raise your leg, the opposite glute medius and minimus will contract to prevent the pelvis from dropping on that side. The primary actions of these two muscles is to assist in hip abduction and medial rotation of the lower limb. During movement, it prevents pelvic drop of the opposite limb.

Often times we overlook these muscles in our training programs, and over time, this can lead to pelvic instability and even low back and knee pain. A 2016 study tested the tensor fascia lata, gluteus medius and gluteus maximus of over 150 subjects with chronic low back pain. They found that the gluteus medius was weaker in people that had chronic low back pain. Another study, which looked at over 800 novice runners, concluded that runners who lack hip abduction strength were at a higher risk for knee pain. Aside from low back and knee pain, there are some other signs that the glutes may be weak or “turned off”. Poor mechanics in squat, hinge and lunges patterns, more specifically knees caving in, may indicate weak glutes. Some other signs may include a lack of soreness in the glutes when the aforementioned movements are trained.

As you can see from the research, strengthening your glute muscles, particularly your gluteus medius, is very important as a preventative measure for possible chronic issues down the road. As an athlete, having weak glutes can be detrimental to stability, mobility, power and strength.

Here are a few glute activation and strengthening exercises you can do on your own.
  1. Supine Glute Bridge with Band Resistance
  2. Sidelying Clamshell with Band Resistance (External Rotation)
  3. Sidelying Clamshell with Band Resistance (Internal Rotation)
  4. Single Leg RDL with Contralateral Reach
  5. Pull-Through


*Depending on your fitness level, you can use this as its own workout. I would work through each exercise performing 2-3 sets of 10 repetitions of each. If you are a little more advanced with your fitness, I would include these exercises into your warm up prior to any lower body work days. Perform 1 set of each exercise for 10 repetitions each as an activation drill prior to your lower body work (specifically squatting or deadlifting). 


1.      Supine Glute Bridge with Band Resistance


  • Begin by placing a band around your legs (just above the knee) and lay on your back with bent knees and your feet pressed firmly into the floor.
  • To begin, start with a deep inhale through your nose (a deep belly breathe is ideal).
  • While exhaling slowly yet forcefully, squeeze your glutes and extend your hips upward.
  • Hold at the top position for 2-3 seconds before relaxing and returning to the start position.


Tip: Proper breathing is a key component on this exercise, especially for those with excessive low back curvature. The forceful exhale will help to brace the core muscles which in turn will prevent excessive extension of the lower back.


2.      Sidelying Clam Shell with Band Resistance (External Rotation)

  
  • Begin by placing a band around your legs (just above the knee) and lying on your side with your legs/feet stacked on top of each other and your knees and hips slightly flexed (You are looking to achieve a neutral flat back).
  • Keeping your feet together, externally rotate your hip while turning your torso down slightly.
  • Squeeze at the top and return to the start position is a controlled fashion.


Tip: You really want to focus on isolating the glute in this exercise. Try only to rotate at your hip and not at your lower back as well.


3.      Sidelying Clam Shell with Band Resistance (Internal Rotation)


  • Begin by placing a band around your ankles and lying on your side with your legs/feet stacked on top of each other and your knees and hips slightly flexed (You are looking to achieve a neutral flat back).
  • Keeping your knees together, internally rotate your hip by lifting your foot upward.
  • Squeeze at the top and return to the start position is a controlled fashion.

Tip: Work hard to lower back to the starting position with as much control as possible.


4.      Single Leg RDL with Contralateral Arm Reach


  • Begin by standing next to a wall in a normal upright standing position.
  • With a soft bend in the knee, slowly begin to reach your hip back (hip hinge) on the leg closest to the wall while simultaneously reaching the opposite arm forward and opposite leg straight back.
  • Once you have achieved an optimal hinge, engage your glutes and return to the start position.

Tip: Do your best to maintain a neutral spine throughout the movement. Be mindful to push your leg straight back. You do not want to rotate at the hip during the movement.

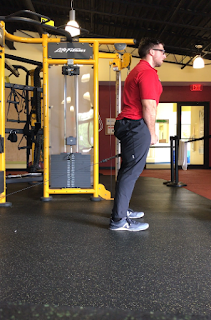
5.      Pull-Through


  • Attach a rope to a cable machine.
  • Begin by stepping over the cable (back to the weight stacks) while grasping the rope with both hands resting on your groin. Feet should be between hip and shoulder width apart. Soft bend in your knees.
  • While inhaling, allow the weight to pull you into a hip hinge. Maintain a neutral spine.
  • Once you have reached your optimal hinge position, squeeze your glutes and extend your hips forward back to the start while forcefully exhaling.

Tip: Do your best to hinge and not squat during this exercise. Your shins should remain as vertical as possible during the movement. Keep your weight centered through your whole foot rather than shifting from heel to toe during the movement.

Blog post by Greg Wilson.

Monday, July 24, 2017

Long Bars, Short Bars, Mini Bars?


A common question when working with clients in the pool is “Which is harder the long bars or the short bars?”  

The answer to the question depends on the exercises that you will be doing and the goals of your exercise program.  Understanding the equipment and the differences will help you choose the appropriate tools to make your workout the most effective.  

Using bars with more buoyancy will create more resistance when trying to move them through the water.  This will make these types of exercises more difficult.  However, exercise where you are in the hanging position will be easier with more buoyant bars because they will provide more support and stability.

Using bars with less buoyancy creates less resistance when trying to move them through the water.  Less buoyant bars will make these types of exercises easier.  The less buoyant bars will make exercises more difficult in the hanging position.  The reduced support and stability will require your body to work harder to maintain alignment therefore challenging your core muscles more.

Example of progression from easy to difficult using equipment for an exercise that requires you to move the bars in and out of the water vs. a hanging exercise.

Pump and Walk
Mini Bar → Short Bars Level 1 → Short Bars Level 2 → Long Bars


Splits and Spreads
Long Bars→ Short Bars Level 2 → Short Bars Level 1 → Mini Bars


Equipment


Long Bars
Long bars provide the most buoyancy, therefore they will give you the most support and resistance.  


Short Bars Level 2
These bars have slightly less buoyancy than the long bars.  They will be a little easier for exercises that require movement through the water and slightly harder for hanging exercises than the long bars.


Short Bars Level 1
The level 1 short bars have less buoyancy than level 2 short bars and long bars.  They will be easier for exercises that require movement through the water and more difficult for hanging exercises.


Mini Bars
Mini bars provide the least amount buoyancy.  These bars will be the easiest for exercises that require movement through the water and the most difficult for hanging exercises.  


Blog post by Eric Chandler.