Wednesday, May 27, 2015

The Animal Workout

It’s #WorkoutWednesday and time for a fun new animal inspired, full body workout routine.  Warm up before trying these 6 moves.  Begin with 10 repetitions each.  Do not perform any exercise that causes or increases pain.

Frog Squats


Frog squats are a challenging exercise strengthening the quads and glutes while increasing hamstring flexibility.

Start with your feet a little wider than shoulder width apart, toes facing forward.  Place your hands on your ankles and press your hips back, lowering yourself into a deep squat.  Keep your back straight and head up. Exhale as you straighten your legs, feeling a nice stretch in the hamstring muscles.  Repeat for 10-15 repetitions.


Dipping Bird


The dipping bird aka single leg dead lift is great for flexibility, strength and stability of the hamstrings, glutes and core. 

Start by holding a dumbbell in your left hand while standing on your right foot.  Hinge forward at the hips.  Your left leg will rise up in extension behind you and move in the same plane as your upper body.  Keep a soft knee, forward facing hips, neural head position and the core engaged.  Don’t allow your upper body to hunch forward or to move independently without your free leg.  This exercise is often done incorrectly so check in with a trainer if you are unsure of the movement.  Repeat 10-15 repetitions and switch to the other side.


Stork with Lateral Raises


This exercise will test your balance while strengthening your deltoids.

Start by standing on one foot holding two dumbbells, palms facing inward.  Raise your arms up, palms facing down, until your arms are parallel with the ground.  Lower to start position.  Repeat 10-15 repetitions and switch to the other side.


Inchworm


The inchworm is a core exercise that will test your hamstring flexibility and work on shoulder and core stability.

Stand with feet shoulder width apart.  Hinge forward at the hips and place your hands on the ground in front of you.  Walk your hand out until you are in a plank position.  Challenge yourself with a push up before walking your feet in towards your hands.  Repeat for 10-15 repetitions.


Donkey Kicks


Donkey kicks, also known as quadruped bent-knee hip extension, targets the glutes as it stretches the hip flexors.

Begin on all 4s (hands under your shoulders, knees under your hips) with your toes digging into the ground.  Keep your left knee bent at 90 degrees while you squeeze your glute and press your heel into the air.  Lower leg without touching the floor.  Make sure you use slow, controlled movements and do not swing your legs.  Repeat 10-15 repetitions and switch to the other side.


Bird Dog


Bird dog is a great core exercise that also focuses on shoulder flexion and hip extension.

Begin on all 4s (hands under your shoulder, knees under your hips) with your toes digging into the ground.  Keep your back straight while lifting your opposite arm and leg in the air, parallel to the ground.  Return to start position and switch.  Repeat for 10-15 repetitions.


Cat Camel


Finish up your workout with the cat camel stretch for mobility in your back.

Begin on all 4s (hands under your shoulder, knees under your hips) with your toes digging into the ground.  Start with your back in a neutral position then alternate between arching your spine upward toward the ceiling (cat) and rounding your back (camel) by relaxing your back and allowing your stomach to fall towards the ground.  Repeat for 10-15 repetitions.

  
Blog post by Jen Skiba. 

Sunday, May 24, 2015

Post-Round Stretches for Golfers

Do you stretch after playing golf?

Post-round stretching is just as important as your dynamic warm up.  The goals of these static stretches are to decrease stiffness, prevent soreness and increase golf flexibility.  The muscle is taken to a point of mild stretch and held for 20-30 seconds.  Perform 2-3 repetitions of each exercise.  Do not perform any exercise that causes or increases pain.

Standing Quad Stretch

In your left hand, hold the club upside down with the grip end planted firmly on the ground.  Stand on your left leg and grab your right foot/ankle with your right hand.  Try to keep your right knee directly underneath you.  Hold 20-30 seconds.  Repeat on the other leg.


Standing Hamstring Stretch

Hold the club upside down with the grip end planted firmly on the ground.  Stand on your left leg and place your right foot onto your golf cart or another elevated stable surface.  Hinge forward into the stretch until you feel a stretch in your hamstrings.  Hold 20-30 seconds.  Repeat on the other leg.


Bent Leg Calf Stretch

Hold the club upside down with the grip end planted firmly on the ground.  Step back with your right foot.  Keep your right heel planted firmly on the ground and slowly bend your back knee.  Hold 20-30 seconds.  Repeat with the other leg.


Standing Figure 4 Stretch

Hold the club upside down with the grip end planted firmly on the ground.  Cross your right leg, resting your right ankle just above the left knee.  Slowly sit back into your imaginary chair until your feel a stretch in your piriformis.  Important: Keep your back straight, do not hunch forward.  Hold 20-30 seconds.  Repeat with the other leg.  (Can also be done seated.)


Standing Prayer Stretch

Hold the club upside down with the grip end planted firmly on the ground.  You can also use your golf cart or higher stable surface.  Sit back into your heels, hinging at the hips until you feel a stretch in your shoulders and lat muscles.  Hold 20-30 seconds.


Wrist Extension Stretch

Grab your right hand with your left hand.  Extend your wrist bringing your finger nails toward your forearm until you feel a mild stretch.  Slowly extend your elbow.  Hold 20-30 seconds.  Repeat on the other arm.


Wrist Flexion Stretch

Grab your right hand with your left hand.  Flex your wrist bringing your finger pads towards your forearm until you feel a mild stretch.  Slowly extend your elbow.  Hold 20-30 seconds.  Repeat on the other arm.

Blog post by Jen Skiba.

Monday, May 18, 2015

Yoga Etiquette

Happy Yoga Monday!

Today I thought we’d address some Yoga Etiquette.  Whether you’re thinking about going to your first class or you’re a veteran yogi hopefully you’ll find some useful information in today’s post.

Turn off your cell phone
Or better yet, don’t even bring it into the yoga room!  One of the goals of a yoga practice is to clear your mind and be fully present on your mat  -nothing will jar you back to reality like the ringing of a cell phone!  
That being said, teachers will certainly understand if there is an extenuating circumstance that requires you to have your phone nearby (a sick child, etc.), just be sure to let the teacher know you are going to have your phone on your mat on vibrate just in case you’re needed.

If you arrive late enter quietly!
Everyone understands life gets in the way and you may be running a few minutes late - hey, we're glad you made it! - but please be considerate and enter the room quietly as to not distract others from their practice.
Also, if you’re more than a few minutes late be sure to take the time to do a few warm up poses before you jump in with the rest of the class – running late is no reason to risk injury because your body wasn’t warmed up properly!

When the teachers asks if you have any injuries tell them!  
I promise you we're not being nosey!  We learn a lot about anatomy in our training and we're knowledgeable as to what poses you should avoid if you are dealing with an injury – we just want to help you have a healthy and safe yoga practice!
A good yoga teacher will tell you if there is a pose you should skip, if there is a way to modify it so it will put less stress on a certain body part, or if there is an alternate pose you can do instead!

Listen to your body
If your body is telling you that it needs a break, then by all means, take a break!  I promise no one is going to think you aren't good at yoga or can't keep up.  And here's a secret...if you're just not feeling a certain pose one day - don't do it!  Really! Feel free to make your practice your own and skip a pose that may not be working for you for whatever reason.

Props and assists aren't just for beginners
Yoga props and assists from a teacher aren't because you can't do a pose and need "help".  Props and assists are to help you get the most out of the pose.  Please don't feel like you're doing something "wrong" or are "not good enough" if you use a prop or a teacher comes over and gives you a gentle hands on assist- in fact I bet most teachers would tell you they LOVE getting assists during a class, it usually helps you access the pose a little deeper than you could on your own!

Don't give up!
If you go to a yoga class and absolutely hate it, please don't give up!  There are many different styles of yoga and many different yoga teachers and you may just not have found the right fit - I can't tell you how important it is to find a teacher you connect with!

See you on the mat!
Danielle

Don’t forget, you can practice with Danielle at Mashpee Fitness on Monday mornings at 8:30am and Thursday mornings at 7am & 8:30am.


Blog post by Danielle Nardi.

Monday, May 4, 2015

Yoga Pose of the Week: Child's Pose

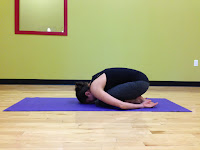
Child’s pose, or Balasana as it is called in Sanskrit, is a resting and restorative pose in the practice of yoga.  In addition to offering a gentle stretch for the hips, thighs and back, Child’s pose also slows the mind by calming the central nervous system and offers an opportunity for inner reflection by allowing the body to fold into itself. 

Child’s pose should be a safe, relaxing place to come to at any point in your yoga practice when you need a break or at any point in your day when you need a calming place to focus.


TO DO:

  • Kneeling on the ground bring big toes to touch sitting back on the heels
  • Knees can stay together or come about hips distance apart
  • On an exhale fold the upper body over or between the legs until the forehead touches the mat, lengthening from the tailbone all the way to the crown of the head
  • Lay your arms alongside your body palms facing up and release the shoulders towards the floor
  • For a more active version extend the arms out long in front of the body
  • Hold for a minimum of 5 breaths, but you can stay for up to a few minutes for full relaxation and stress relieving benefits!


VARIATIONS:

For knee issues either keep your hips lifted or place a folded towel or blanket under your seat to create more space and put less pressure on the knees.


If you prefer not to get on the floor you can do a modified Child’s pose while seated in a chair.  Place a pillow or folded blanket on your lap and fold the upper half of the body forward over the pillow.

If you’re ever feeling overwhelmed or stress or your body needs a break in a yoga class know that Child’s pose is always there for you!

Namaste,
Danielle


Don’t forget you can join Danielle for yoga at Mashpee Fitness on Monday and Thursday mornings at 8:30am and for Yoga for Athletes on Thursdays at 7am!

Blog post by Danielle Nardi.