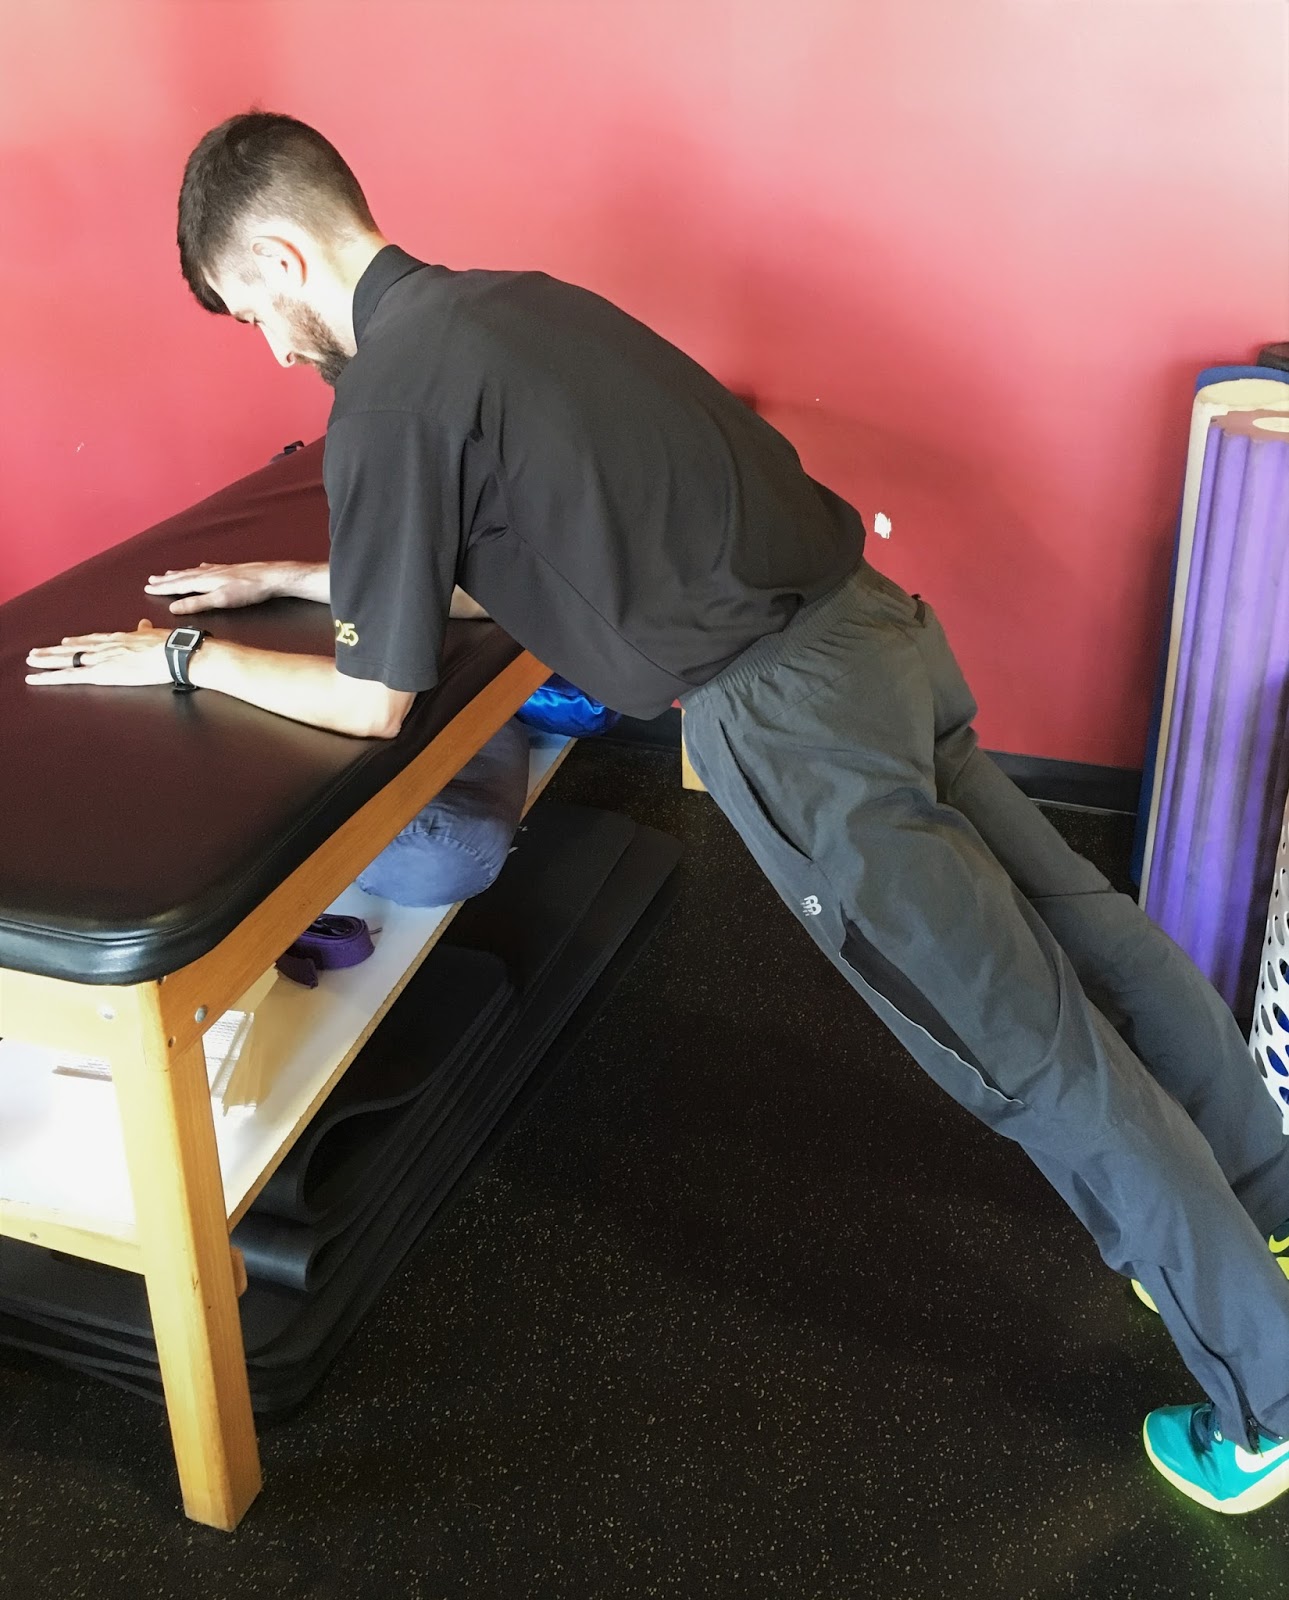
While data on
exercise changes as new studies are done, one thing that remains constant is that planks
are great... but only when you do them properly!
The traditional plank (shown above) targets more than just your
abdominals. It requires contraction of the quads, glutes, shoulders, biceps and
triceps. It is a stabilizing exercise that can lead to improvements in other
exercise moves.
3 Common Plank Form Mistakes
Arched Back
Note: In this position your abs will be inactive. This also put a lot of strain on your lower back!
Hips Too High
Uneven Hips
Other Plank Variations
On Hands
Side Plank
Taking Your Plank to the Next Level
Alternating Leg Lifts
Up, Up, Down, Down
Side Plank with Rotation
Side Plank with Hip Dips
Physioball Planks
TRX Plank
Planks can assist in many other areas!
Balance
The core
stability provides and increases in your overall stability and balance. Example: if you are
bumped into while walking, having a stronger core can assist you in regaining
your balance faster.
Maintain Proper Running Form
A stable core helps a runner’s body stay in proper alignment, rather than twisting mid stride.
Maintain Form in Many Other Lifts
One of the first steps in many lifting exercises is to
engage your core. Having a stronger core can make it easier to keep proper form
in many activities and can prevent injury to the back.
Shin splints are a painful condition caused by microtears of
connective tissue at attachment sites in the tibia (lower leg bone) from
overuse or mechanical stress. Symptoms include
pain and tenderness along the front of the shin (tibia) and when chronic or
severe, may be accompanied by swelling and the presence of ridges or bumps
along the front of the bone.
Muscle weakness, stiffness, and poor alignment of the lower
extremity joints (such as flat feet) and use of non-supportive shoes may predispose
you to developing shin splints particularly if training or activity is accelerated
too quickly, you walk/run on hard, ramped or uneven terrain, or you play a stop
and go high impact sport such as basketball.Shin splints can side line even the most seasoned athlete.
To prevent and treat the condition try the following
exercises.Stretches should be held for
a minimum of 30 seconds to allow time for tissue elongation and to avoid reflex
shortening. Repeat 2-3x, 3x/day. Strengthening should be done 10-20 repetitions
for 2-3 sets daily.Icing, kinesiotaping,
and non-steroidal medications may be helpful in the management of pain.Consult your physical therapist for
assessment and always speak to your doctor before taking any medication.
Stretching
Calf stretch
(gastrocnemius)
Stand upright holding chair or
hands on wall for support with one leg behind you, foot flat and pointed
straight ahead.Keeping back heel down
and knee straight, bend front knee.Stretch will be felt in calf and Achilles.
Tip:Tighten abdominals and don’t lean forward
with trunk.
Soleus stretch
Stand upright holding chair or with hands on wall for support with one leg
behind you, foot flat and pointed straight ahead.Keeping back heel down, bend BACK knee.
Stretch will be felt in lower part of calf deep under Achilles tendon.
Tip:If you cannot keep your heel down,
shorten your stride.
Toe stretch (toe
flexors and plantar fascia)
Place 2-3” book or small
platform/step against wall.Place toes
against edge of step. Keeping knee straight, lean towards wall. Stretch will be
felt in arch of foot.
Dorsiflexor
stretch (tibialis anterior)
Sit on knees on cushioned surface
with ankles pointing down.Sit back on
heels to stretch front of foot and ankle.Leaning back with upper body will intensify the stretch.
If unable to
kneel, or if ankles are too tight, sit up with foot crossed in front of you and
use your hand to pull ankle and foot downward.
Strengthening
Ankle
Dorsiflexion (anterior tibialis)
Long sit on
bench or floor. Anchor tubing away from you with loop around foot.Keeping foot and ankle aligned with toes
facing up, flex ankle up towards you to the count of 2, and return down to the
count of 4.
Tip:To maintain proper alignment, keep 2nd toe in line with your shin bone.
Wall Toe Raises
(toe extensors and anterior tibialis)
Stand with back
against wall, feet slightly away and facing forward.Lift toes off ground keeping knees straight.
Hold 5 sec.
Tip:If unable to raise, toes, bring feet a little
further from wall.
Calf Raises
(gastro-soleus)
Stand with feet
shoulder width apart. Go up on toes to count of 2, lower to count of 4.
Challenge yourself by doing on one leg.
Tip: To progress
strengthening through greater range of motion, do off edge of step.
Toe Curls (toe
flexors and plantar fascia)
Sit in chair. Place
towel on tile or wood floor.Position
bare foot on towel.Keeping heel down,
curl toes to “scrunch” towel.
Single Leg Bridge
(gluteal muscles)
Lie on your back with knees bent and feet on floor.Straighten one leg keeping thighs in line.
Tighten abdominals and lift hips off ground using bent leg. Keep pelvis
level.Hold 5 sec.
Tip:If too difficult, keep both feet on floor while lifting hips.
Heel to toe
walking
Start in standing position. Step out with
right foot flexing ankle toward you as your foot contacts the ground.Transfer weight to ball of right foot, go up
on toes, then step forward with the left foot contacting heel first with ankle
up.Repeat cycle.
Dr. Coluccini received her Doctorate with distinction from Arcadia
University and her BS in Physical Therapy from Boston University. She brings 39 years of continuous clinical orthopedic, sports and geriatric physical therapy
experience to patient care. Prior to relocating to Cape Cod, Dr. Coluccini
owned a successful private practice in NY and is currently licensed in both New
York and Massachusetts. Jody believes that successful rehabilitation is a
collaborative effort between the therapist and patient achieved by mutual trust
and respect, constant therapeutic reassessment, mutual goal setting and patient
compliance. She understands that being "fit" as one ages or returns
from injury or illness requires a constant modification of goals and activity.
Daily tasks can be painful and difficult
when arthritis and other types of joint issues affect the hand and wrist. There
are numerous medications and treatment solutions that can help ease the pain
but exercise is one of the best and noninvasive solution that can provide many
benefits.
Hand exercises can help strengthen the
muscles that support the hand joints. Movement with exercises and stretches
will help to keep ligaments and tendons flexible resulting in better range of
motion and function.
What is happening to cause the pain you
might ask? The lack or cartilage or cushioning in the joint causes inflammation
and irritation. Pain can increase with repetitive tasks such as typing or
gripping. The production of synovial fluid which lubricates the joints can be
increased when the hand and wrist are exercised and stretched regularly- this
will improve joint function.
Take a look at the exercises below and
give them a try!
Thump
Opposition
Begin sitting with your hand in a
comfortable position. Touch the tip of your thumb with one finger, then
separate and repeat with each of your other fingers. Make sure to keep the rest
of your arm relaxed during the movement.
Finger
O
Begin sitting upright in a chair with
your elbow resting on a table, palm facing forward, and fingers straight. Make
a circle with your thumb and index finger. Straighten them back out and repeat.
Make sure to keep your wrist straight during the exercise.
Finger
Spreading
Begin sitting upright in a chair with
your hand resting flat on a table. Spread your fingers apart as far as is
comfortable then bring them back together and repeat. Make sure to keep your
fingers on the table during the exercise.
Seated
Claw Fist AROM
Begin with your wrist and fingers
straight. Curl your fingers toward your palm, bending at the middle knuckles. Return
to starting position then repeat. Make sure to keep your wrist straight during
the exercise.
Seated
Full Fist AROM
Begin with your wrist and fingers
straight. Curl all of your fingers toward your palm into a fist—light squeeze
or no squeeze. Return to the starting position
then repeat. Make sure to keep your wrist straight during the exercise.
Wrist
Circumduction AROM
Begin sitting with your arm resting on a
table and your hand in a fist, hanging off the edge. Slowly rotate your wrist
in a circle, first clockwise then counterclockwise. Make sure to keep your wrist
relaxed during the exercise.
Standing
Wrist Flexion Stretch
Begin in a standing upright position
with one arm in front of your body, palm facing the floor. With your other
hand, bend your wrist downward until you feel a stretch. Make sure to keep your
elbow straight.
Standing
Wrist Extension Stretch
Begin in a standing position with one
arm in front of your body, palm facing the ceiling. With your other hand, apply
a gentle downward pressure on your fingers, bending your wrist and keeping your
elbow straight.
Personal
training is an option for members who need the extra motivation or guidance to
get through a workout. It’s also a great
way to learn new exercises and progress your fitness routine.
Working with a
trainer is great but are you getting the most out of your sessions?
Set Clear Goals
It’s important
that you and your trainer are on the same page. It’s also important that you set clear goals so
your trainer can build the appropriate program for you. Think SMART
goals: Specific, Measurable, Achievable, Realistic, Timely. Goal setting should be worked into your first
appointment and revisited during each session.
Arrive Early
I say this
over and over again to my clients… warm up before your session! Showing up late not only cuts into your
training time but now the trainer has to incorporate a warm up into the routine
leaving not much time for actual exercise.
Show up early to get in a little cardio, dynamic stretches and/or foam
roll so you’re ready to go when the session begins.
Speak Up
Communication
should go both ways. Ask questions. Let your trainer know how you’re feeling and exactly
what you’re feeling. If something isn’t
right, don’t be afraid to speak up. We
appreciate your feedback and honestly!
Do Your Homework
You can’t just
show up to your once a week training appointment and expect to see progress. Your trainer can work with you to build a weekly
plan but it’s ultimately up to you to commit by exercising on your own, eating
right and recovering well.
Bring A Buddy
Still struggling
with motivation? Find a friend with similar
fitness levels and goals to team up with.
They can help get you out the door on days you may consider cancelling
and help push you harder during the workout.
One-on-one personal training can get expensive so ask about most
cost-effective group personal training rates.
Attitude Is Everything
Everyone has
their own reason for working out but if you’re not invested in your own health
and fitness, you’re never going to get results.
A positive attitude is key along with patience, commitment, consistency,
and hard work.
Do you remember your first plank you
were asked to hold? Did it feel like the seconds were minutes and that someone
had lit a fire under muscles in your stomach that you never knew you had? Well
if you dread the plank or are having a difficult time maintaining good form
here are a couple methods to use to improve your experience.
Do you ever get pain in your lower back?
Set up is key!
When preparing to plank it is important
to remember the focus of the exercise is preventing hyperextension of the lower
back. That being said, engaging the
muscles of the lower abdomen and pelvis properly before even lifting off of the
table is crucial in preventing any excessive motion in the lower spine. One
strategy is utilizing the Posterior Pelvic Tilt. This exercise will teach you
how to build tension in your lower abdomen and create a “flat back” to help aid
in any drooping or arching of the lower back when in the prone position.
Supine
Posterior Pelvic Tilt with Ball Squeeze
Begin by lying on your back with your knees bent and
feet flat on the floor. Place a ball between your knees and squeeze. Slowly
bend your low back and tilt your pelvis towards the floor. Return to start
position.
Do you feel more pressure in your
shoulders than your stomach?
Improper alignment of the shoulders over
the elbows can cause abnormal strain on the individual’s tendons and ligaments
of the shoulder joint leading to possible injury. It is just as important to
ensure to keep the weight of your torso from sinking to the ground as well as
shifting forward during the plank. This can again place a shearing force across
the joint line of the shoulder and needs to be avoided. One exercise that can
help is the Scapular Push Up on a Table.
Plank on
Table with Scapular Protraction Retraction
Place both hands on the edge of a table and step your
feet back into a plank position. Slowly round your upper back, pulling your
shoulder blades apart. Next, lower your back down, squeezing your shoulder blades
apart.
Remember to breathe!
How often do we tend to hold our breath
when performing strenuous exercise? This sometimes can hurt you more than help
you. In our case with the plank, a deep exhale through pressed lips can help
tighten your core just before you lift up and continue to hold the ribs down to
prevent hyperextension at the back during the hold. Quadruped Diaphragmatic
Breathing drills can help you establish a good spinal position as well as core
contraction just from breathing!
Quadruped
Diaphragmatic Breathing
Begin on all fours. Breathe in, pushing your abdomen
down, then exhale and repeat. Make sure there is no movement in your chest or
shoulders as you breathe.
Plank Progressions:
Plank with Elbows on Table --> Plank on Knees --> Standard Plank